
A few people asked how I created the circles so here we go. I actually first used this method when I was making little woolly underpants for Seamus the monkey and I wanted a nice finish on the tail hole.
I also used the same method to create windows in the Animal house pattern.
I'm sure there are a zillion similar methods out there by real quilters and certainly properly piecing circles is not in my repertoire but I love the little window-look I get this way.
The patterned fabric is the top fabric, the white is the "lining" of the circle and the bright blue is the piece we want peeking through. (Normally the "lining" would be the same as the top fabric but its easier to show here with different fabrics.) Draw the EXACT size circle that you want on the back of your lining piece and place it face down in position on your top fabric.
 Sew completely around the circle directly on the line. Trim your lining fabric
 Cut the centre out of the circle leaving about 1/4 inch seam allowance inside your sewing line. Clip the circle.
 Now tuck the lining piece in through the circle and smooth it out behind.
 Hey presto ! Give it a press with the iron.
 This is what we have at the back
 and in between the layers.... You can further trim that lining piece on the back if you like.

Put your third piece of fabric behind the window you have created (This would be good for fussy placement of little pictures)
Draw the EXACT size circle that you want on the back of your lining piece and place it face down in position on your top fabric. Sew completely around the circle directly on the line. Trim your lining fabric
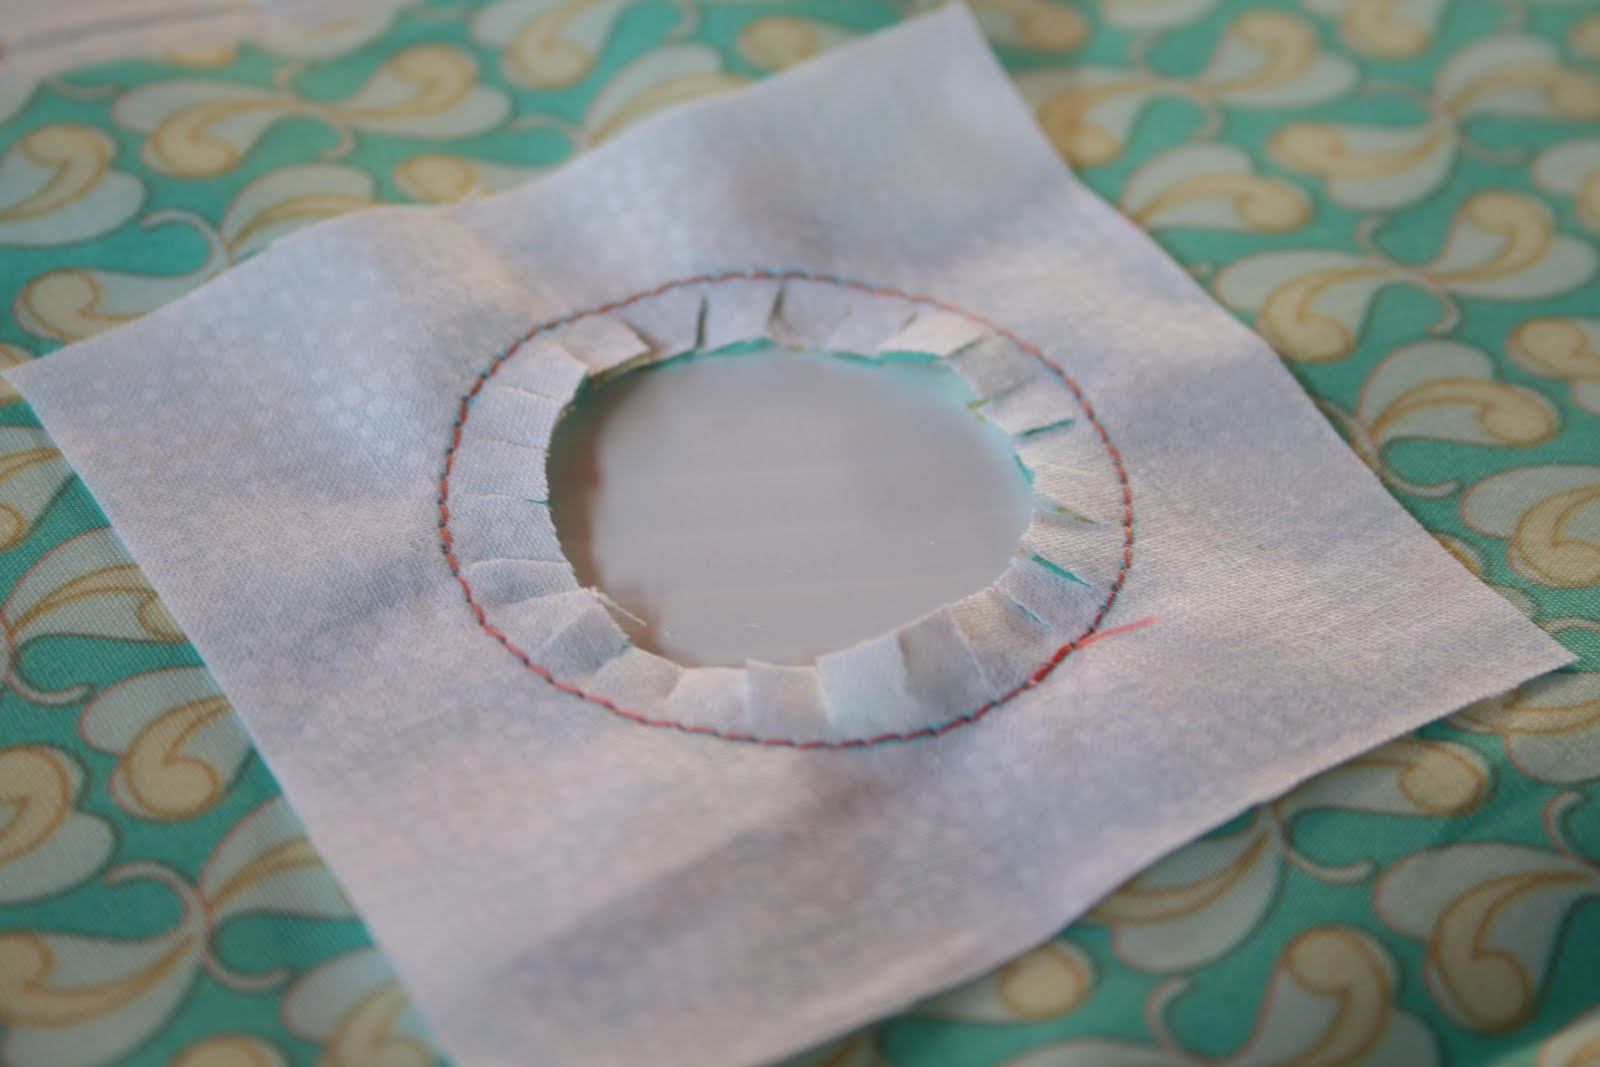 Cut the centre out of the circle leaving about 1/4 inch seam allowance inside your sewing line. Clip the circle.
 Now tuck the lining piece in through the circle and smooth it out behind.
 Hey presto ! Give it a press with the iron.
 This is what we have at the back
 and in between the layers.... You can further trim that lining piece on the back if you like.
Put your third piece of fabric behind the window you have created (This would be good for fussy placement of little pictures)
Top stitch around the circle using a small stitch, holding your third piece of fabric into place.
So guys this is by no means a definitive way to do this, its just the way that works for me and gives the effect I want.
So guys this is by no means a definitive way to do this, its just the way that works for me and gives the effect I want.
(I cannot tell you how much that orange thread is grating on me and my anal ways)
brilliant!
ReplyDeleteThanks you have made it all so clear , even I can understand how to do it now !
ReplyDeleteVerification word is binge , lol !
Thank you, this really helps me with a somewhat unrelated sewing puzzle. :)
ReplyDeleteSB
oooerrr, you've just given me a super idea Miss Jod! Thanks for the quick tute!
ReplyDeleteSmarty smarty! I'm SO going to try this :)
ReplyDeleteWonderful tut Jodie! And I bet I know what Gilly is thinking! xox
ReplyDeleteThat is brilliant Jodie, now of course i want to try one. Perhaps a mini quilt for my wall!!
ReplyDeleteThanks Jodie! The tutorial is great.:)
ReplyDeleteAwesome!!!
ReplyDeleteYou might be teaching some people to suck eggs but I would never have worked that out!
ReplyDeleteGreat tutorial Jodie!
ReplyDeleteYou will be pleased to hear I have just wiped the comment I started. It was about needing the doctor, gauze and grazing. You are welcome ;-)
ReplyDeleteThanks Jodie, now I want to make circles
ReplyDeleteToo cool!
ReplyDeleteYou are an absolute genius! Now I want to start hacking into all my clothes to make pretty peek-a-boo holes!
ReplyDeleteWonderful....I can just see some of those in felt! Thanks Jodie :-)
ReplyDeleteClever, just love stealing, i mean, being inspired by your craftiness - yes, me being crafty as in 'devilish'. Shall make your circles perfection, love Posie
ReplyDeleteFab tutorial, so clear! Thank you x
ReplyDeleteGreat tutorial
ReplyDeleteOMG - simple yet I would never have worked it out for myself! Now I'm thinking up lots of ideas :)
ReplyDeleteLovely! Now I can make holes in everything. WOOHOO! I was wondering how you got those nice holes when it wasn't wool fabric. Thanks!
ReplyDeleteOh. My. God. It's like the heavens opened and the angels sang out... woh. That is so darn cool!
ReplyDeleteThat's fabulous.... I - like everyone else who has commented up there ^^^^ - am currently eyeballing the room for things which I can put holes into!!
ReplyDeleteAnd I know you are in Australia and all that but I don't like the way your internet is trying to tell me I am older already. The last three posts say it is Tuesday 24th (my birthday!!) but my good ole UK internet tells me that I am still 31 for an hour and 16 minutes yet!!! LOL
You make it all look so easy Jodie.
ReplyDeleteThanks for the tutorial.
Hugs ~ Kerryanne
Very clever! I must remember this method for future projects. Thanks!
ReplyDeleteThanks for sharing - you have made it looks so easy.
ReplyDeleteLOVE it! Your job always looks so impeccable and neat! (I am green with envy :)
ReplyDeleteThank you for sharing!
Great tute!!
ReplyDeleteNo egg sucking over at my place!!
nice circle.... steals idea and runs away..... ^_^ not sure what i would use it for though......
ReplyDeleteas for egg sucking yuck i think i might dry reach now..... :(
And you could do it with squares and ovals and triangles and...and...and
ReplyDeleteHow easy peasy is that!...simple and effective...excellent...thanks for sharing...now, breath Jodie, breath...the orange thread is just a tutorial tool...it's OK...you can take it out now....
ReplyDeleteAwesome! Thanks so much for this. I will have to give it a go!!
ReplyDeletefantastic ..... I am so going to use this at every opportunity. Thanks. :-)
ReplyDeleteRebecca
Love all your going around in circles Ms Ric Rac-you are very clever:)
ReplyDeleteGreat post! Love the circles.
ReplyDeleteThat's clever!
ReplyDeleteyou da bomb! thanks for the tute, how easy peasy! Thanks Jod.
ReplyDeleteWHat a fabulous TUTE! I appreciate it greatly! You are awesome :)
ReplyDeleteLove love it!! Now if only I could get my house cleaned and have my baby sleeping for more than 15 minutes at a time and also not screaming.... I might give it a go! ;) Feeling miserable much?? (yes!) Can't wait to see what you come up with! :)
ReplyDeleteWHOAH! That's so clever. I would never have worked that out n my own, thank SO much for sharing. Great instructions!
ReplyDeleteHey Jodie - I MUCH prefer your way - Thank YOUUUuuu
ReplyDeleteNow thank you missus! That's a very helpful bit of info and I love the look of your new quilt idea! Locket xx
ReplyDeleteNice! It's given me some ideas for some creative repairs :)
ReplyDeleteAh excellent. I know a little girl who will now be getting some spiffy monkey close now the tail issue is gone!
ReplyDeleteThanks
PS. big giveaway on my blog next week!
I tried this out last night. Super easy. Used my embroidery machine to make the circles. Very easy!!
ReplyDeleteThanks for sharing.
Shannon
Thanks for the tute. This was a new technique for me. I've tried it as a bellybutton on a cat softie and it worked really well.
ReplyDeleteLove it! What a brilliant method.
ReplyDeleteLike I said in flickr - genius!! I must try this :)
ReplyDeleteFirst of all, this is a great idea. Second of all, you did a fabulous job writing out said great idea. Thank you. I just used the tutorial to suck a hexagon, and I am 110% addicted. This is fantabulous.
ReplyDeleteWe were asked to use your tutorial for a virtual quilt bee, and I am in love with it! I made a sample block first, just to try it out. Rather than make a circle, I decided to make a big hexagon, and I felt like I hung the moon when I finished! It was so easy and it looked great!
ReplyDeleteThen I made circles for the bee blocks, and I just think this is the greatest tutorial!
Thank you! I can piece circles! Yay!
Awesome! So glad I found you and you are most definately my favorite person today. Thank-you for this great tutorial :)
ReplyDeletewhat an easy way to do such a difficult thing. i will remember this technique, and find somewhere to use it. thanks tina
ReplyDeleteThanks for making circles so easy. I used your tutorial to make the circle "door" in my rocketship.
ReplyDeletehttp://littlebitsofcrunchandfluff.blogspot.com/2011/04/rocketman.html
I guess it did not go through..someone sent me this link after me requesting for someone who knew how...if you would like to share this with our group at stash...we have an upcoming campaign that I know many would love you for as well as our sponsors are always looking for new ambassadors..wink...toodles mdm samm
ReplyDelete